
System Center Endpoint Protection is a security program developed by Microsoft that offers virus and malware protection for Windows operating systems. It is a comprehensive solution that combines antivirus, antispyware and firewall to keep your devices safe.
We will show you step by step how to install System Center Endpoint Protection on your system. You will see how to download and install the program, configure protection options and perform security scans . Also, we will give you some tips to maximize the effectiveness of this tool and keep your system protected at all times.
Download the System Center Endpoint Protection setup file from the official Microsoft website
To start installing System Center Endpoint Protection on your system, the first thing you need to do is download the setup file from the official Microsoft website . Make sure you choose the correct version of the software that is compatible with your operating system.
Double click on the downloaded file to start the installation process
Once you've downloaded the System Center Endpoint Protection installation file , double-click it to start the installation process.
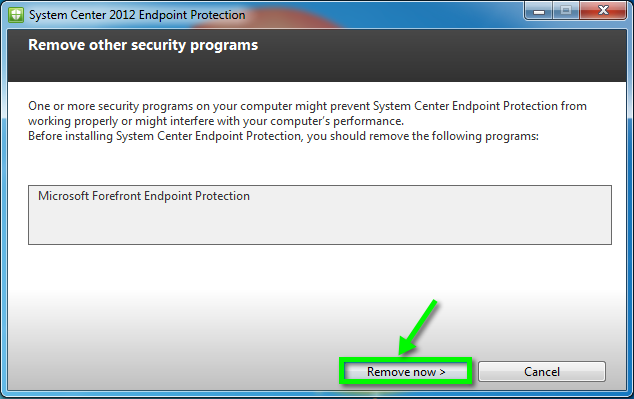
Follow the instructions on the screen to complete the installation of System Center Endpoint Protection
Once you have downloaded the System Center Endpoint Protection installation file , follow the instructions below to complete the installation process:
Step 1: Run the setup file
To get started, double-click the setup file you downloaded to run it. An installation window will open.
Step 2: Select the installation language
In the installation window, you will be asked to select the language in which you want to install System Center Endpoint Protection . Select your preferred language and click “Next”.
Step 3: Accept the license terms
The System Center Endpoint Protection license terms will then be displayed . Please read the terms and conditions carefully and, if you agree, check the box indicating that you accept the terms. Then click “Next”.
Step 4: Select the installation location
At this stage, you will be prompted to choose the location where you want to install System Center Endpoint Protection on your system. You can keep the default location or select a different location by clicking “Browse”. Once you have selected the location, click “Next”.
Step 5: Select the components to install
In this section, you will be able to select the specific components that you want to install along with System Center Endpoint Protection . You can choose whether to install the detection engine, real-time protection, and other additional features. Check the boxes corresponding to the components you want to install and click “Next”.
Step 6: Set up automatic updates
You will then be given the option to configure automatic System Center Endpoint Protection updates . You can choose whether you want to allow the program to automatically search for and install the latest updates. Select the option of your preference and click “Next”.
Step 7: Complete the installation
Finally, you will be shown a summary of the options you have selected during the installation process. Review them again, and if you are satisfied, click "Install" to begin the installation of System Center Endpoint Protection on your system.
Once the installation process is complete, you will be shown a message indicating that the installation has finished successfully. Click "Finish" to close the installation window.
Congratulations, you have successfully installed System Center Endpoint Protection on your system! Now you can enjoy complete protection against threats and malware.
Make sure you have a stable internet connection during installation to download the latest virus definition updates
To ensure you have a successful installation of System Center Endpoint Protection on your system, it is important to have a stable Internet connection . During the installation process, the program will take care of downloading the latest virus definition updates, which will ensure that your system is protected against the latest threats.
Reboot your system once the installation has finished
Once you have completed the installation of System Center Endpoint Protection on your system, it is important to reboot your system to ensure that all changes are applied correctly and the program is fully functional.
Once restarted, open System Center Endpoint Protection and configure the protection options you want to use
Once you've rebooted your system, the next step in installing System Center Endpoint Protection is to open the program and configure the protection options you want to use. This will allow you to customize the way the security software protects your system.
To open System Center Endpoint Protection , follow these steps:
- Go to the start menu of your operating system.
- Find the System Center Endpoint Protection program and click it to open it.
Once you have opened System Center Endpoint Protection , you will see a series of configuration options that you can adjust according to your needs. These options include:
- On-Access Scan: This option allows you to enable or disable real-time scan. When enabled, security software will automatically scan your files and programs for potential threats.
- Automatic Updates: You can choose whether you want System Center Endpoint Protection to automatically update itself for the latest virus definitions and other security updates.
- Exclusions: If you have files or folders that you want to exclude from security scans, you can add them to the exclusions list.
- Default actions: You can configure the actions that System Center Endpoint Protection will take when it detects a threat, such as delete, quarantine, or allow the threat. You can also set specific actions for different types of threats.
Once you have set the protection options to your preferences, you can click the “Save” or “Apply” button to save the changes.
Remember that it is important to keep System Center Endpoint Protection updated and perform regular scans to ensure maximum protection of your system against security threats.
Regularly update virus definitions to keep your system protected against the latest threats

One of the best practices to keep your system protected against the latest threats is to regularly update the virus definitions of your protection software. For System Center Endpoint Protection, having the most up-to-date definitions is essential to ensure effective protection.
Virus definitions are files that contain information about the characteristics and behavior of the latest malware threats. By updating these definitions, your protection software can more effectively detect and remove viruses and other types of malware that could infect your system.
To update virus definitions in System Center Endpoint Protection, follow these steps:
- Open Control Panel and find the System Center Endpoint Protection section.
- Click the “Update Now” or “Check for Updates” option to start the update process.
- Wait for the software to check for available updates on Microsoft servers.
- Once the updates are found, the software will automatically download and install them on your system.
- After the update is complete, the software will display a message that the virus definitions have been updated successfully.
It is important to note that this update process must be carried out on a regular basis to ensure effective protection. We recommend configuring System Center Endpoint Protection to automatically check for updates and install them in the background without user intervention.
Remember that keeping your virus definitions up to date is essential to protect your system against the latest malware threats. Don't forget to perform these updates regularly and make sure you have a stable internet connection to download the updates successfully.
Run regular scans of your system with System Center Endpoint Protection to detect and remove potential malware
System Center Endpoint Protection is a security tool that allows you to protect your system against malware , viruses , and other threats. One of the key features of this tool is the ability to perform periodic scans of your system for potential threats.
Step 1: Download and install System Center Endpoint Protection
To get started, you need to download and install System Center Endpoint Protection on your system. You can find the latest version of this tool on the official Microsoft website . Follow the installation instructions to complete the process.
Step 2: Set up the scan schedule
Once you've installed System Center Endpoint Protection , it's important to set up a schedule for regular scans . To do this, open the tool and go to the settings section. Here you can set the frequency and time of the analysis.
Step 3: Select analysis options
System Center Endpoint Protection offers you different analysis options. You can choose between a quick scan , a full scan , or a custom scan . Depending on your needs and the time available, select the option that best suits you.
Step 4: Perform periodic analysis
Once you've set up your schedule and selected your scan options, it's time to run your regular scan . You can do it manually or wait for the system to do it automatically according to the established schedule.
Step 5: Review the results and take action
Once the scan is complete, System Center Endpoint Protection will show you the results. Carefully review the reports and take the necessary actions to eliminate any detected threats. You can configure the tool to perform automatic actions or do it manually.
Step 6: Keep your protection up to date
Remember that the security of your system depends on keeping the protection updated. System Center Endpoint Protection provides regular updates to virus definitions and other threats. Make sure to set the tool to update automatically so that you are always protected against the latest threats.
Follow these steps and perform regular scans of your system with System Center Endpoint Protection to keep it protected against potential threats. Remember that prevention is key to avoiding security problems.
Frequent questions
1. What are the minimum requirements to install System Center Endpoint Protection?
The minimum requirements are: 1 GB of RAM , 1.4 GHz processor speed and 4 GB of disk space .
2. Can I install System Center Endpoint Protection on operating systems other than Windows?
No, System Center Endpoint Protection is only compatible with Windows operating systems .
3. Do I need a license to install System Center Endpoint Protection?
Yes, a valid license is required to install and use System Center Endpoint Protection.
4. Can I install System Center Endpoint Protection on more than one device?
Yes, you can install System Center Endpoint Protection on multiple devices as long as you have the appropriate licenses .
.jpeg)
.jpeg)
No hay comentarios.:
Publicar un comentario